






How to Use Batch Processing in AudioDirector
Apply one effect preset to several recordings and export them all in the format you choose, in a single run.
Updated · 4 min read
In a hurry? Use the Batch Processing quick guide instead.
When a season of podcast episodes or a folder of voice clips needs the same treatment, doing each file by hand takes a long time. AudioDirector's Batch Process handles the whole set in one run. It applies a favorite effect preset to every file you choose and exports each one as a new file with the format, sample rate, bit depth, and channels you set.
- In the Edit room, open an effect and choose a preset. Click the gear button, then the star to save it as a favorite.
- Choose File > Batch Process.
- Select your preset under Favorite preset and check the files to process. To add other files, click the import button.
- Click Settings, choose the format, sample rate, bit depth, channels, and location, then click OK.
- Click Start.
Steps to Process Several Audio Files at Once in AudioDirector
Step 1: Save an Effect as a Favorite Preset
Batch Process applies a favorite preset to every file, so save one first. In the Edit room, select a clip. In the Editing Tools panel, expand Apply Effect and click Reverb. Open the Presets menu and choose a preset. This example uses Large.
Click the gear button next to Presets, then click the star button to add the preset to your favorites. The star turns blue once it's saved. The preset now appears in Batch Process as Reverb - Large.


Step 2: Open Batch Process
Click File in the menu bar and choose Batch Process. The Batch Process window opens and lists the audio files already in your library.

Step 3: Choose the Preset and Files
At the top of the window, open the Favorite preset menu and choose Reverb - Large. Until you save a favorite, the menu shows only No presets.
In the file list, check the box next to every file to process. This example checks all three sample files. Format shows each source file's format. Produce Profile shows the settings of the exported file.


To add a file that isn't in your library yet, click the import icon at the top left of the Batch Process window and choose the file.

Step 4: Set the Export Settings
Click Settings at the bottom of the window to choose how the new files are saved.

The Export Settings window has two sections, File information and Audio profile settings. Click OK when you're done.

- File information: Check Postfix and type text to add to the end of each new file name. That makes the new files easy to tell from the originals. Location is the folder the files are saved in. Next to Location, click the … button to choose a folder. To save each export next to its source file, check Same as source file location.
- Audio profile settings: Choose the Format, Sample rate, Bit depth, and Channels for every file in the batch. Each menu is covered below.
By default, files go to the live folder in Documents\Cyberlink\AudioDirector.
Open the Format and Sample rate menus to see their options.
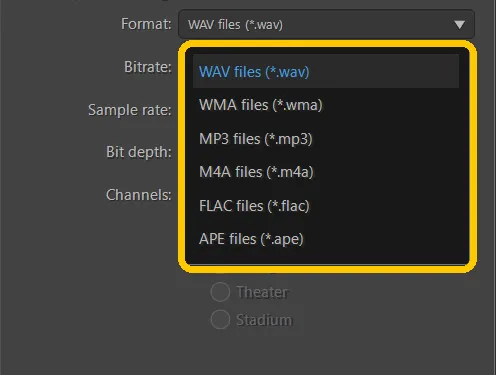
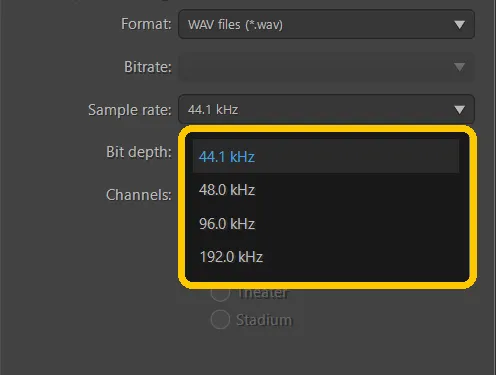
Format sets the file type of every export. Bitrate stays grayed out for WAV and becomes available for formats such as MP3 and M4A.
| Format | Why pick it |
|---|---|
| WAV | Stores uncompressed audio, a safe choice for more editing. It's the default. |
| WMA | Makes smaller files that play in Windows Media Player. |
| MP3 | Makes small files that play on almost any device or app. |
| M4A | Makes small files with good quality that play on Apple devices and most players. |
| FLAC | Compresses without losing quality, so files are smaller than WAV. |
| APE | Also compresses without losing quality, but fewer players support it. |
WAV, FLAC, and APE are lossless, but a file is only as good as its source. An MP3 exported as WAV keeps the quality of the MP3.
Sample rate sets how finely the sound is sampled:
| Sample rate | Why pick it |
|---|---|
| 44.1 kHz | The default. It suits music and most voice recordings. |
| 48.0 kHz | The standard for video, so pick it for clips that go into a video project. |
| 96.0 kHz | Use it for a 96 kHz source or a project that needs it. Files are larger. |
| 192.0 kHz | The highest setting and the largest files. Use it only when a project calls for it. |
A rate higher than the source doesn't add detail. Now open the Bit depth and Channels menus.
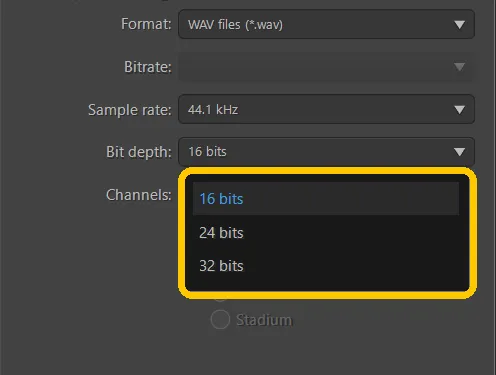
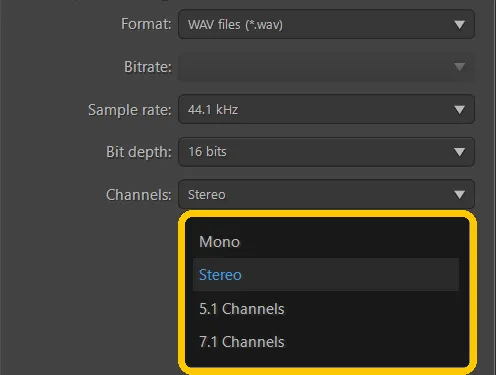
| Setting | Option | Why pick it |
|---|---|---|
| Bit depth | 16 bits | The default and the standard for CD-quality audio. |
| Bit depth | 24 bits | Leaves more room for editing and mastering, with larger files. |
| Bit depth | 32 bits | The largest files. Use it only if your editing workflow needs 32-bit audio. |
| Channels | Mono | One channel and smaller files, which suits a single voice. |
| Channels | Stereo | The default, with a left and a right channel, like the original files here. |
| Channels | 5.1 Channels and 7.1 Channels | Surround layouts for projects that play on a surround system. |
This example keeps the defaults: WAV, 44.1 kHz, 16 bits, and Stereo. Click OK to save the settings.
Step 5: Click Start to Export the Files
Click Start. The Status column shows Processing... next to the file being handled, and a progress window shows the name of the file being saved. Click Cancel in that window to stop.


When every file is done, the Batch Process window closes by itself, and no message appears. AudioDirector adds the exported files to the library. In this example, look for Mahoroba.wav, Song.wav, and Voice over.wav. Edited copies marked with an asterisk, such as *Mahoroba.mp3, appear too.

We tested these steps in AudioDirector 365 version 17.0.6908 on Windows.
Don't have AudioDirector yet? Apply one effect to a whole set of recordings and export every file in a single run.
Download AudioDirector Free →FAQ About Batch Processing in AudioDirector
Yes. Batch Process applies a favorite preset to every file, and the Favorite preset menu shows only No presets until you save one. Open an effect in the Edit room, choose a preset, click the gear button, and click the star button.
No. It exports new files, and the originals stay in the library. To avoid overwriting a file with the same name, choose a different Location or check Postfix in the Export Settings.
The Format menu offers WAV, WMA, MP3, M4A, FLAC, and APE, with WAV selected by default. The export settings apply to every file in the batch.


