






How to Add Text to Photos in PhotoDirector
Put a headline on your photo and style it with outlines, glows, or a photo fill.
Updated · 7 min read
In a hurry? Use the Add Text to Photos quick guide instead.
PhotoDirector's Design workspace puts each piece of text on its own layer, so you can restyle or move it without redoing the rest of the design. Use it to put a headline or a price on a shop photo for a social post or flyer. You can also outline the letters, make them glow, or fill them with a photo.


- In PhotoDirector, choose Design from the launcher.
- Click Import > From Local Drive to open your photo.
- Click the T icon in the left toolbar, then click Add text.
- Double-click the text box and type. With the text selected, pick a font, size, and color in Text Properties.
- Check Border 1 or Shadow, or pick a shape under Text Effects.
- Click fx on the text layer to add Outer Glow, Bevel & Emboss, or Drop Shadow.
- To fill text with a photo, put the photo layer right above the text layer, right-click it, and choose Apply Clipping Mask.
- Click Export, choose a format, and click Export again.
Steps to Add Text to Photos in PhotoDirector
Step 1: Open Design
From the PhotoDirector launcher, choose Design. For more on how layers work in Design, see How to Use Layers in PhotoDirector.

Step 2: Import Your Photo
Under Import Photo, click the arrow on Import and choose From Local Drive to open the photo you want to add text to.

PhotoDirector asks whether to add a white layer beneath your image, and this example clicks No. The photo then shows up as a layer in the Layer Manager on the right.

Step 3: Add a Text Box
Click the T icon in the left toolbar to open the Text panel, then click Add text at the top of the panel.

A text box that reads Add text appears on the photo. The Text Properties panel opens on the left, and a new text layer appears at the top of the Layer Manager. To move the text box, drag the move icon below it.

Step 4: Type and Style Your Text
Double-click the text box, select the placeholder words, and type your own. Changes in Text Properties apply only to selected text, so keep your text selected while you style it. To select all of it, double-click the box and press Ctrl+A.
Open the font list at the top of the panel to pick a font. Recently Used and Favorite Fonts sit at the top of the list. A font with a download icon beside it isn't on your computer yet, so click the icon to download it first. This example uses Segoe UI Black.

Below the font list, set the font size, line spacing, and character spacing. Click the Color swatch to change the text color. Further down are the bold, italic, and alignment buttons and the Kerning checkbox, which evens out the space between letter pairs. To rename the text layer, right-click it and choose Rename. This example names it Headline.

In the Color Picker, choose a color on the Color Board or type a hex code. Or click the eyedropper and pick a color from the photo. Then click OK.


Step 5: Add a Border, Shadow, or Curve
Scroll down the Text Properties panel for three quick effects. Each one is optional, and like the font settings, it changes only the selected text. Uncheck an effect to remove it.
Outline the Letters With a Border
Check Border 1, click its color swatch to pick a color, and drag the Size slider to set how thick the outline is. This example uses pink at a size of 4.29.


Add a Shadow
Check Shadow and click Color to pick the shadow color. Then use the Blur, Distance, and Opacity sliders to soften the shadow, move it away from the letters, and make it fainter or stronger. A dark shadow helps light text stand out on a busy photo.


Curve the Text With Text Effects
Click the abcde preview next to Text Effects at the bottom of the panel, then pick a shape, such as an arch, a wave, or a circle. This example picks the arch in the first row. To make the text straight again, pick the first shape.


Step 6: Add Glow and Depth in Layer Properties
For more styles, click the fx icon on the text layer in the Layer Manager.

The Layer Properties window lists nine styles: Bevel & Emboss, Border 1, Border 2, Inner Shadow, Inner Glow, Color Gradient, Outer Glow, Drop Shadow, and Layer Fill. Check a style to turn it on, and click its arrow to see its settings. Keep Preview with all layers checked to judge the text against your photo. Click OK when you've finished with the styles below.

Make the Text Glow With Outer Glow
Check Outer Glow, choose a Blending mode, and click Color to pick the glow color. Under Technique, choose Softer for a natural glow or Precise to follow the letter shapes closely. Then drag Choke to set how far the glow spreads over the letters, and Size to set how big the glow is.
This example uses Screen, pink, Softer, Choke 30, and Size 30, so the headline matches the neon sign. Click OK to apply it, or keep adding styles.



Add Depth With Bevel & Emboss
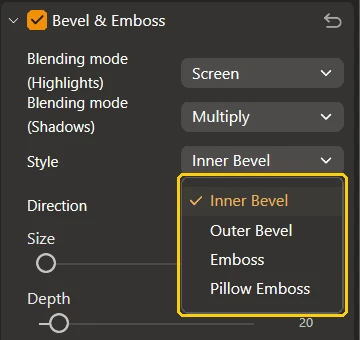
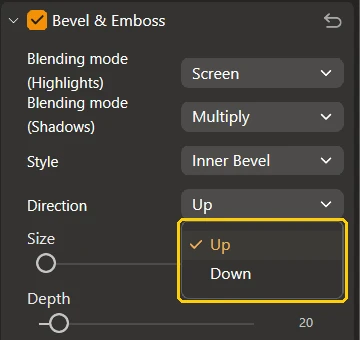
Check Bevel & Emboss to give the letters a raised look. Open the Style list and choose Inner Bevel, Outer Bevel, Emboss, or Pillow Emboss. Then set Direction to Up or Down, and adjust Size and Depth until the edges look right. This example uses Inner Bevel, Up, Size 60, and Depth 72.



Add a Drop Shadow
Check Drop Shadow and open the Blending mode list to choose how the shadow mixes with the photo. This example uses Multiply. Drag Distance to move the shadow away from the text, and turn the Light Source dial to change the direction it falls. Use Spread and Size to set how far it spreads and Opacity to set how strong it is. Click OK to apply your styles.


A black drop shadow shows up best on a light background. On this night photo it's barely visible, so the glow does most of the work.
Hide, Copy, or Clear Styles
Back in the Layer Manager, click the arrow at the right end of the text layer to list its styles. Here the headline keeps Outer Glow and Drop Shadow.

Click the eye icon beside a style to hide it without deleting it. Click it again to bring the style back.


To reuse the look on another layer, right-click this layer and choose Copy Layer Properties. Then right-click the other layer and choose Paste Layer Properties. Clear Layer Properties removes every Layer Properties style from the layer.

Step 7: Fill Text With a Photo
A clipping mask shows a photo only inside the shape of the layer right below it. To fill text with a photo, this example uses a second design: big SURF text on a white layer. The wave photo is added as a layer and scaled to cover the letters.
Add the photo as a layer and put it right above the text layer in the Layer Manager. To move a layer, select it and press Ctrl+X. Then select the layer it should sit above and press Ctrl+V. For now, the photo covers the whole canvas.

Right-click the photo layer and choose Apply Clipping Mask.

The photo now shows only inside the letters, and a clipping icon appears beside the photo layer.


Step 8: Export Your Photo
Click Export at the top of the window.

In the Save Photo window, check the Export Destination and choose a Format, such as JPEG. Under Image Sizing, keep the original resolution, or choose Resize to fit and enter a width and height. Then click Export.

The Result
The café photo now has a headline, an opening-hours line, and a price badge, each on its own layer. The headline in the finished post uses only the Text Properties shadow, so the Step 6 glow and bevel are other looks to try. The opening-hours line is a second text layer, and the badge is a yellow circle drawn with the Shape tool with two text layers on top.
We tested these steps in PhotoDirector 365 version 18.0.10 on Windows.
Don't have PhotoDirector yet? Put a headline, a price, or a photo-filled word on your own photos, and change the style later.
Download PhotoDirector Free →FAQ About Adding Text in PhotoDirector
Text Properties changes apply only to selected text. Double-click the text box and press Ctrl+A to select all of it, then change the font, color, border, or shadow.
Export saves one flat photo. To keep every layer editable, also choose File > Save As and pick PHI files, then open that file in Design later.
Right-click the photo layer and choose Remove Clipping Mask. The photo covers the canvas again, and the text layer is unchanged.


